Services22.com
How to Configure and Setup Service 22
How to Configure and Setup Service 22
WHATSAPP Setting
Download our Services22 from CodeCanyon, extract its contents.
In the downloaded Zip file, you will find below files & folders
- upload.zip – a zip folder containing all the required files you need to deploy on to the server.
- cred.txt - a file containing admin email & password which you can change later.
- services.sql - a file containing database structure & initial data to get started.
- documentation.docx – Documentation file which have all process about Services22.
Now you need to upload “upload.zip” folder to your web server where you
want it to access / host and extract it.
Setup Database
Follow the below steps to setup database.
- Create a Database using your choice for the demonstration purposes I, used phpmyadmin if you are doing it on Shared Hosting databasecreation method may vary you may also need to create & assign user. Assign user with created database with all permission.
- Once database is created, say services
- Then you need to click on services database from left sidebar
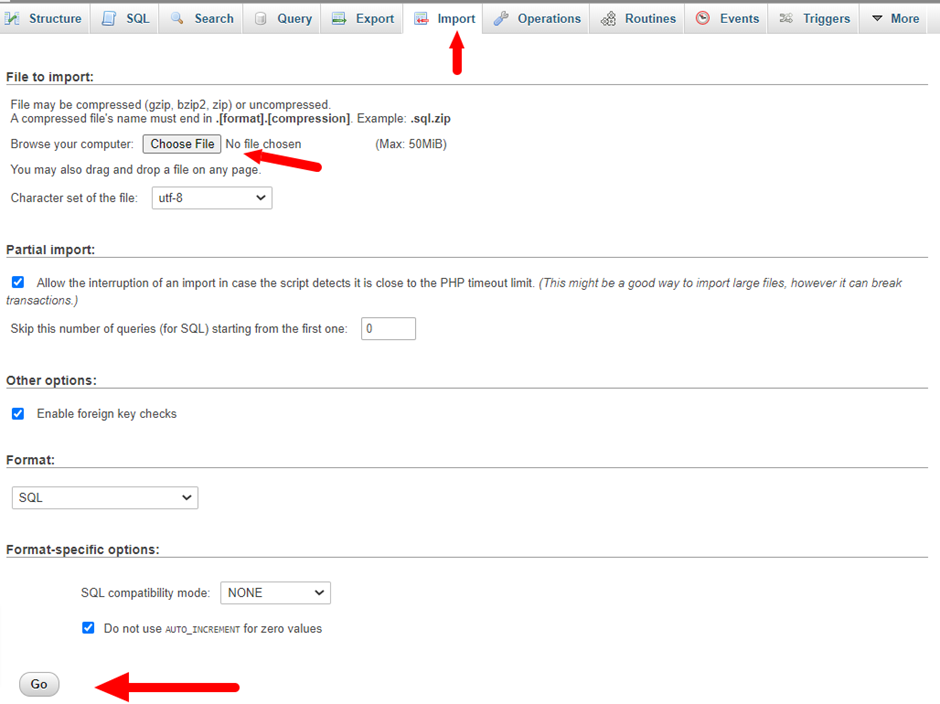
- Go to the phpMyAdmin and click on Import tab.
- Choose services.sql file in file to import option
- Then click on Go button
- If everything goes fine, there should not be any errors & your database
Setup is now completed.

Configure & Setup File
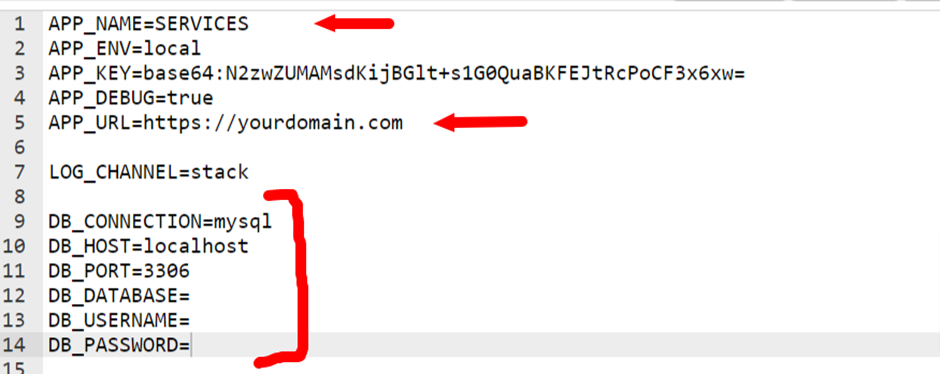
Now go to Source folder & open .env file in to text/code editor.
- Now you need add your APP_NAME like SERVICES
- Add your web url APP_URL like https://yourdomain.com
- Now you need assign values for Database Configuration values so the
Application can connect to database
o DB_HOST - your database host in most cases its localhost
o DB_DATABASE - your database name.
o DB_USERNAME - your database username.
o DB_PASSWORD - your database password.

Configure Cron
Set a cron to auto update order number on change month like “yymm1001”
which will run 1 time every month by using this comment
wget -q -O - https:// yourdomain.com/en/cron/orderseries >/dev/null 2>&1
![]()
If you done above steps carefully and for example If you placed this in root of
your domain, and configured your server to point webroot to public folder then
you should access following page by pointing your browsers address bar to
https://yourdomain.com or you need to access it like
https://yourdomain.com/public
Now you can access admin panel by using below detail and update required fields
https://yourdomain.com/en/login
Email: [email protected]
Password: 12345678